Tucked away in Apple's Mail are a number of useful capabilities that aren't entirely obvious. By taking advantage of these oft-overlooked features, you can save time and effort, and improve the chances that you and your correspondents will connect in a timely way.
If you frequently send e-mail to the same group of people—all the students in your class or all the coworkers in your department, say—there's no need to retype (or copy and paste) the addresses every time. Mail offers shortcuts for addressing messages to groups, but they're easy to miss because you can't configure the groups in Mail itself. Instead, Mail uses groups you define in the separate Address Book application.
To create a group, open Address Book (in /Applications), and make sure the Group and Name columns are visible (if not, choose View -> Card and Columns). If you haven't already done so, create a card (File -> New Card) for each of the people to whom you want to send e-mail regularly. (You can do this quickly in Mail by selecting a message and then choosing Message -> Add Sender To Address Book or pressing Command-Shift-Y.)
Once all your cards are made, choose File -> New Group in Address Book, type a group name, and press Return. Now select All Contacts at the top of the group list. For each contact you want to be part of that group, select the person's name and drag it onto the group name. (You can also shift-click to select multiple contiguous names, or Command-click to select non-contiguous names.)
Back in Mail, to address a message to a group, type the group's name in any address field (To, Cc, or Bcc). As you start typing, Mail will offer to auto-complete the group name; press Tab to accept the suggestion. If you prefer to see all the individual addresses rather than the group name, choose Mail -> Preferences, click on Composing, and select When Sending To A Group, Show All Member Addresses. If you want to be sure any recipient can reply to all the others, put the group address in the To or Cc field and make sure Show All Member Addresses is enabled. If you prefer to hide the recipient addresses, put the group address in the Bcc field (if it's not visible, choose View -> Bcc Address Field).
Send messages to the right address
Let's say you've created a group as just described, but some of the group members have more than one e-mail address—perhaps a work address and a home address. How can you be sure that the message goes to the right address for each person when you use a group address? The answer is a distribution list, which specifies which of an individual's addresses should be used for each group of which that person is a member.
To change a distribution list, open Address Book and choose Edit -> Edit Distribution List. Select a group in the list on the left, and the right side of the window shows all the group members and their addresses. You'll see the address Mail is using for each person in this particular group in bold text. To use a different address for any group member, select that address. Or, to switch all group members to use a certain address category (for example, all home addresses or all work addresses), choose the category from the Change All Labels pop-up menu in the upper-left corner.
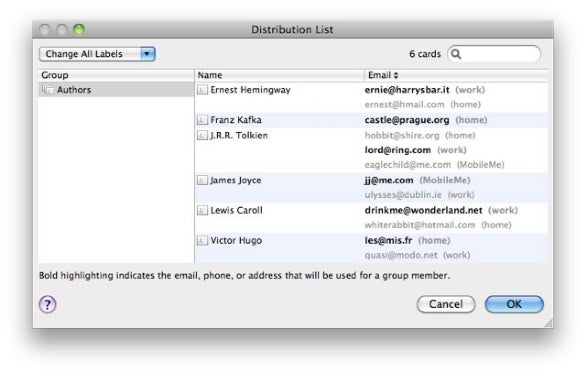
If group members have more than one address, you can use a distribution list to select which one is associated with a given group.
Give messages a priority
If you want an especially important message ("Need file within the next 15 minutes!") to stand out in the recipient's inbox, you can mark it as "high priority." On the other hand, if a message is unimportant ("Free brownies in the break room") and you want to signal this, you can mark it as "low priority." E-mail clients display priority in slightly different ways. In Mail, if the Flags column is visible (View -> Columns Flags), high-priority messages are marked with two exclamation points (!!) and low-priority messages display a hyphen (-).
Before you can change the priority on outgoing messages, you must display the priority menu. To make this menu appear in all new messages, open a new message window, click on the small pop-up menu in the lower-left corner of the message header, and choose Customize. Your window changes to show all the options for the appearance of the new message window. Select the checkbox next to the Priority pop-up menu (labeled with an exclamation point) and click OK. From now on, you can choose Low Priority, Normal Priority, or High Priority from that newly added menu.
View multiple mailboxes at once
You can select any mailbox in Mail's sidebar to see its contents, but many people don't realize you can select multiple mailboxes at the same time to display the contents of all of them. As in most of the OS X's list views, Shift-click to select contiguous mailboxes, or Command-click to select non-contiguous mailboxes.
I find this particularly useful in combination with message threading (View -> Organize by Thread). For example, I can select my Inbox and my Sent mailbox together and use threading to see the entire flow of a conversation between myself and another person. This technique also works when searching: select multiple mailboxes, type a term in the Search field, and click Selected Mailboxes to search only within the mailboxes you've selected.
No comments:
Post a Comment