iPhoto includes most of the image editing tools that casual photographers need to spruce up their photos. In fact, it may have more powers than even seasoned iPhoto users realize. Here is a handful of my favorite iPhoto image editing tips.

Make a shortcut for editing
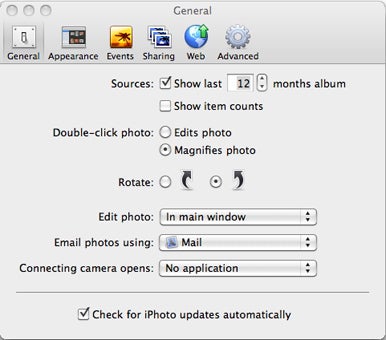
I spend far more time looking at pictures in iPhoto than I do editing them. So in Preferences, I have the "Double-Click Photo" option set for "Magnifies." That way, when I double-click on a thumbnail, I see a bigger version of the shot. However, when I do want to edit an image instead of just viewing it, all I have to do is hold down the Option key when I double-click. This takes me directly to Edit mode instead.
Quick zoom for closer look
Once you're in Edit mode, you might want a closer look at a particular area. This is handy to gauge sharpness and quality, or to fix a small flaw in your image. Place your mouse pointer over the area that you want magnified, then press the 1 key. iPhoto takes you to a 100 percent view of the very spot you want to see. Want to get even closer? Press the 2 key. Now you're at 200 percent. Whoa, too close? just press the 0 key to return to the normal view.
Recover blown-out highlights
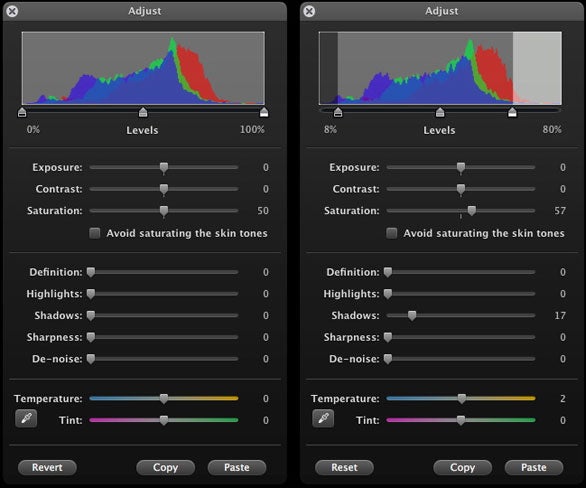
Raw file shooters have an extra goody just for them in the Adjust palette: a hidden highlight recovery slider. This is a subtle, elegant tool for bringing detail back in the super bright areas of the image. (Being able to restore this information is one of the benefits of shooting raw.) I find the recovery slider much less heavy-handed than the Highlights slider, which tends to dull the entire image rather than just recovering detail.
To use the recovery slider, first find a raw file in iPhoto and go to Edit mode. Then open the Adjust palette by pressing the letter A on your keyboard. Hold down the Option key, and you'll see that the Exposure slider becomes a Recovery slider. You can be fairly aggressive with this adjustment without worrying about compromising your image.
The Highlights slider (left) versus the Recovery slider (right).
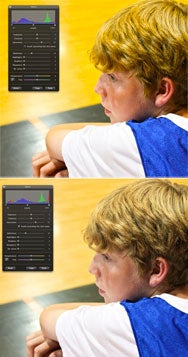
The top image has the Protect Skin Tones setting off, and the bottom image has it on.Add vibrancy to a dull scene
The top image has the Protect Skin Tones setting off, and the bottom image has it on.
Many high-end image editors, such as Photoshop, Lightroom, Adobe Camera Raw, and Aperture have a Vibrance (or Vibrancy) control that lets you increase the richness of color in a photo without polluting the overall picture. As part of this wonderful feature, the skin tones are protected even though the environment becomes more rich and colorful. Vibrancy adjustments look more natural than increasing the Saturation.
Fortunately, iPhoto also has a Vibrancy slider—you just don't see it. To enable it, check the box labeled "Avoid Saturating The Skin Tones" that's beneath the Saturation slider. By doing so, you change the behavior of the Saturation slider to that of a Vibrancy slider. Even though its label remains the same, the results will be very different. Checking the box not only helps protect the skin tones from odd color tints, it protects the entire photo from becoming garish. Your boosted colors will look far more natural using Vibrancy.
This is such an improvement, in fact, that I recommend that you leave the box checked all the time.
Fine tune the enhance tool
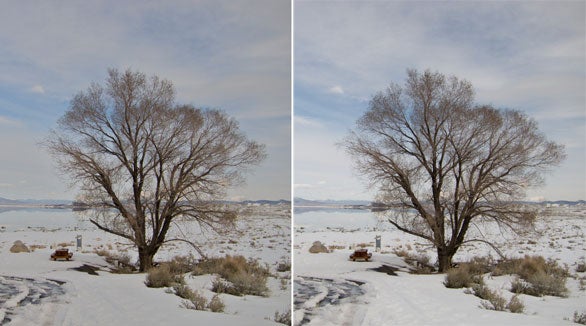
Before the Enhance button is pressed (left) and after (right).
You can. While in Edit mode, open the Adjust palette first. Note the position of its various sliders. Now, with Adjust open, click on the Enhance tool (magic wand icon to the left of Red Eye). After your picture is "enhanced," you'll see that iPhoto tells you exactly what it did by moving the appropriate sliders in the Adjust palette. Not only can you learn how Enhance works its magic, you can fine-tune the results by further adjusting the sliders it moved.
See before and after
Regardless of which of these techniques you're using, how do you know that you're actually making your picture better than the original shot? You can easily check your work along the way by pressing the Shift key at any time. When the shift key is down, you see the original image, take your finger off it, and the edited version re-appears.
If you don't like what you've done, iPhoto always lets you go back to the original shot via the Revert command: Photos -> Revert…
[Senior Contributor Derrick Story teaches iPhoto on Lynda.com and runs a virtual camera club at thedigitalstory.com.]
No comments:
Post a Comment